
When you purchase a MegaSquirt kit, the components typically arrive individually packed, with part numbers. As a result, while you should verify that you have received all you ordered, it is not necessary to identify each item by color, markings, etc.
If you have questions about the specification or appearance of any item, check the part number at the Digi-Key site (http://www.digikey.com/) first. Entering the part number in their search engine will give you access to both the catalog information and the data sheet from the manufacturer.
Assembly Guide for MegaSquirt Main Board Version V3.0
MegaSquirt uses a number of components. These components are installed on the silkscreen side of the PCB, and in most case it will be easiest to solder them from the other side of the board. Electrically, the soldering works fine from either side, but as you get more components on the board, it gets harder to solder on the components side, forcing you to use the other side for soldering. There are three ways you can be sure of putting the right components in the right places with the right orientation. Most electronic parts have a standardized scheme for identification.
There are a large number of cryptic designations in building a MegaSquirt. Many of these have the form of a capital letter followed by a one or two digit number. These indicate components that are installed on the MegaSquirt main board (or stim, etc.) and are specific to each PCB. So R9 means resistor (R) number 9. Note that the main board has a R9, as does the stim, and they are different. Here are some examples:
There are also a number of X jumper locations (X1, X2, etc.). These generally specify a location on the board to solder a jumper, if you look at the board with all the components installed you should see a X1, X2, etc... still visible. They can also have other designations, such as JS4, or JS1.
The components themselves have a designation as well, and confusingly, these also often have the form or capital letters followed by numbers. For example, IRFZ44 = a specific component - the injector driver FETs.
Finally, there is the component part number, used to order the part from a supplier, and this can be different again.
For example, the injector driver FET for bank 1 is:
When you aren't sure, a search of the manual, and/or a quick look through the BOM should help you sort it out. Here are the parts used to assemble the V3.0 main board:
Color Code Legend
|
|
|
|
|
|
|
|
|
|
Please note that a few component values may have been tweaked - especially in the VR input circuit, but possibly others as well. Follow the Digi-Key BOM values for the current component specifications and use these over the values listed below.
|
QTY
Needed |
QTY
Ordered |
MegaSquirt References
|
Digi-Key
Part Num. |
Unit Cost
|
Circuit
|
Component Name
|
| 10 | 10 |
C1,C3,C13,C18,C19, C23,C26,C27, C28, C29, C31 |
399-4329-ND | 0.157 | Basic Components | Capacitor 0.1µF 50V 10% CER RADIAL - X7R |
| 3 | 3 | C11,C21,C32 | 399-2075-ND or 399-4326-ND | 0.18 | Basic Components | Capacitor 0.01µF 50V 10% CER RADIAL |
| 2 | 2 | C16,C17 | 399-1420-ND or 399-3584-ND | 2.60 | Basic Components | Capacitor TANT 22µF 25V 10% RAD |
| 4 | 5 | C2,C9, C10, C30 | 399-2083-ND or 399-4353-ND | 0.53 | Basic Components | Capacitor 0.22µF 50V 10% CER RADIAL - X7R |
| 1 | 1 | C20 | 399-4361-ND | 0.23 | Basic Components | Capacitor 0.033µF 50V 10% CER RADIAL |
| 2 | 2 | C14,C22 | 399-3559-ND | 0.71 | Basic Components | Capacitor TANT 4.7µF 25V 10% RAD |
| 1 | 1 | C24 | 399-1911-ND | 0.28 | Basic Components | Capacitor 47PF 200V 5% CER RADIAL |
| 1 | 1 | C25 | 399-1908-ND | 0.28 | Basic Components | Capacitor 22PF 200V 5% CER RADIAL |
| 6 | 10 |
C4,C6,C8,C12, C15 |
399-4202-ND | 0.127 | Basic Components | Capacitor 0.001µF 100V 10% CER RADIAL - X7R |
| 2 | 2 | C5,C7 | 399-2102-ND or 399-4389-ND | 1.40 | Basic Components | Capacitor 1.0µF 50V 10% CER RADIAL - X7R |
| 7 | 10 | D1-3,D9-11,D24 | 1N4001DICT-ND | 0.136 | Basic Components | Diode GPP 50V 1A DO-41 |
| 1 | 1 | D12 | 1N4749ADICT-ND | 0.36 | Basic Components | Diode Zener 24V 1W 5% DO-41 |
| 1 | 1 | D13 | 1N4742ADICT-ND | 0.36 | Basic Components | Diode Zener 12V 1W 5% DO-41 |
| 3 | 10 | D14,D15,D16 | 67-1102-ND | 0.098 | Basic Components | LED Red Translucent Round |
| 2 | 2 | D17,D18 | 1N5819DICT-ND | 0.39 | Basic Components | Diode Schottky 40V 1A DO-41 |
| 1 | 1 | D19 | 1N4734ADICT-ND | 0.36 | Basic Components | Diode Zener 5.6V 1W 5% DO-41 |
| 2 | 2 | D4,D8 | 1N4748ADICT-ND | 0.36 | Basic Components | Diode Zener 22V 1W 5% DO-41 |
| 2 | 2 | D5,D7 | FR302DICT-ND | 0.42 | Active flyback | Diode FAST REC 100V 3A DO-201AD |
| 3 | 3 | D6,D20,D21 | 1N4753ADICT-ND | 0.36 | Basic Components | Diode Zener 36V 1W 5% DO-41 |
| 2 | 2 | F1, F2 | RXEF050-ND | 0.48 | Spares | Polyswitch RXE Series 0.50A HOLD |
| 2 | 2 | L1,L2 | M8388-ND | 1.01 | Basic Components | Choke RF Varnished 1UH 20% |
| 1 | 1 | MOV1 | P7315-ND | 0.75 | Basic Components | Surge absorber 20MM 22V 2000A ZNR |
| 1 | 1 | P1 | A23305-ND/A32119-ND | 2.07 | Basic Components | Connector D-SUB RECPT R/A 9POS PCB AU |
| 1 | 1 | P2 | A23289-ND or A32103-ND | 4.38 | Basic Components | Connector D-SUB PLUG R/A 37POS PCB AU |
| 2 | 2 | Q1,Q5 | IRFIZ34GPBF-ND | 1.43 | Spares | HEX/MOSFET N-CH 60V 20A TO-220FP |
| 1 | 1 | Q16 | 497-2716-5-ND | 6.08 | High-Current Ignition Driver | IC DRIVER 340V 7.5A ISOWATT220 |
| 2 | 2 | Q2,Q4 | ZTX450-ND | 0.63 | Basic Components | Transistor NPN 45V 1000MA TO-92 |
| 2 | 2 | Q22,Q23 | ZTX553-ND | 0.67 | VR Sensor | Transistor PNP 100V 1000MA TO-92 |
| 2 | 2 | Q3,Q11 | 497-2629-5-ND | 1.05 | Basic Components | Transistor PNP 6A 100V HI PWR TO220AB |
| 9 | 9 |
Q6,Q7,Q8,Q10,Q13, Q14,Q15,Q19,Q20 |
2N3904FS-ND | 0.16 | Basic Components | Transistor NPN SS GP 200MA TO-92 |
| 2 | 2 | Q9,Q12 | TIP125TU-ND | 0.63 | Active flyback | Transistor PNP DARL -100V -5A TO-220 |
| 7 | 10 |
R16,R19,R26,R27, R29,R42,R55 |
1.0KEBK-ND | 0.056 | Basic Components | Resistor 1.0K Ohm 1/8W 5% Carbon Film |
| 5 | 5 | R2,R9,R10,R32,R36 | 1.0KQBK-ND | 0.056 | Basic Components | Resistor 1.0K Ohm ¼W 5% Carbon Film |
| 9 | 10 |
R1,R6,R14,R17,R21, R44,R48,R53,R54 |
10KEBK-ND | 0.056 | Basic Components | Resistor 10K Ohm 1/8W 5% Carbon Film |
| 3 | 5 | R22,R49,R50 | 100KEBK-ND | 0.056 | Basic Components | Resistor 100K Ohm 1/8W 5% Carbon Film |
| 2 | 5 | R11,R51 | 1.0MEBK-ND | 0.056 | Basic Components | Resistor 1.0M Ohm 1/8W 5% Carbon Film |
| 1 | 5 | R23 | 10MEBK-ND | 0.056 | Basic Components | Resistor 10M Ohm 1/8W 5% Carbon Film |
| 2 | 5 | R15,R20 | 22QBK-ND | 0.056 | Basic Components | Resistor 22 Ohm ¼W 5% Carbon Film |
| 2 | 5 | R4,R7 | 2.49KXBK-ND | 0.108 | Basic Components | Resistor 2.49K Ohm ¼W 1% Metal Film |
| 6 | 10 |
R18,R30,R31,R33, R34,R35 |
270QBK-ND | 0.056 | Basic Components | Resistor 270 Ohm ¼W 5% Carbon Film |
| 3 | 5 | R24,R25,R28 | 330QBK-ND | 0.056 | Basic Components | Resistor 330 Ohm ¼W 5% Carbon Film |
| 1 | 5 | R12 | 390H-ND | 0.046 | Basic Components | Resistor 390 Ohm ½W 5% Carbon Film |
| 1 | 5 | R13 | 4.7KEBK-ND | 0.056 | Hall/Coil(-Sensor | Resistor 4.7K Ohm 1/8W 5% Carbon Film |
| 1 | 5 | R3 | 51KEBK-ND | 0.056 | Basic Components | Resistor 51K Ohm 1/8W 5% Carbon Film |
| 2 | 2 | R37,R38 | TAH20PR050J-ND | 6.73 | Current Limiting | Resistor .05 Ohm 20W TO220 |
| 2 | 5 | R39,R40 | 1.0H-ND | 0.046 | Basic Components | Resistor 1.0 Ohm ½W 5% Carbon Film |
| 1 | 1 | R43 | 13FR010-ND | 1.46 | High-Current Ignition Driver | Resistor Current Sense .010 Ohm 3W |
| 2 | 5 | R45, R46 | 10KQBK-ND | 0.056 | Basic Components | Resistor 10K Ohm ¼W 5% Carbon Film |
| 2 | 5 | R47, R57 | 47KEBK-ND | 0.056 | Basic Components | Resistor 47K Ohm 1/8W 5% Carbon Film |
| 2 | 5 | R5,R8 | 2.2KQBK-ND | 0.056 | Basic Components | Resistor 2.2K Ohm ¼W 5% Carbon Film |
| 1 | 1 | R52 | CT94W104-ND | 1.68 | VR Sensor | Trim Pot 100K Ohm TOP ADJ |
| 1 | 1 | R56 | CT94W103-ND | 1.68 | VR Sensor | Trim Pot 10K Ohm TOP ADJ |
| 1 | 1 | U3 | 160-1300-5-ND | 0.32 | Hall/Coil(-Sensor | Optoisolator w/base 6-DIP |
| 1 | 1 | U4 | IXDI404PI-ND | 2.06 | Basic Components | MOSFET Driver LS 4A DUAL 8DIP |
| 1 | 1 | U5 | LM2937ET-5.0-ND | 1.65 | Spares | Regulator LDO TO-220 |
| 1 | 1 | U6 | 497-2055-5-ND | 1.39 | Basic Components | DVR/RCVR 5V RS232 16 DIP |
| 1 | 1 | U7 | LM2904NFS-ND | 0.50 | VR Sensor | OpAmp Dual SGL SUPP HS 8DIP |
| 1 | 1 | Y1 | 300-1002-ND | 0.28 | Spares | Crystal 32.768KHz CYL 12.5PF |
| 1 | 2 | NA | 4724K-ND | 0.93 | Active flyback | Mounting Hardware TO-220 |
| 1 | 1 | NA | AE7240-ND or AE10018-ND | 1.95 | Basic Components | Socket Machine Pin ST 40POS GOLD |
| 1 | 1 | NA | AE7216-ND or AE10013-ND | 0.72 | Sockets | Socket Machine Pin ST 16POS GOLD (Max232) |
| 2 | 2 | NA | AE7208-ND or AE10011-ND | 0.35 | Sockets | Socket Machine Pin ST 8POS GOLD (IXDI404PI) |
| 1 | 1 | NA | AE7300-ND or AE10021-ND | 0.55 | Sockets | Socket Machine Pin ST 6POS GOLD (4N25) |
| 3 | 5 | NA | 67-1044-ND | 0.072 | Basic Components | Bezel LED Panel 5MM BK Nylon 2PC |
| 1 | 1 | NA | 237F-ND | 2.29 | Cables | Connector DB-37 Female; |
| 1 | 1 | NA | 937GM-ND | 2.23 | Cables | DB-37 Hood; |
| 1 | 1 | NA | AE1020-ND | 5.35 | Cables |
DB-9 Straight-through cable (6.5 feet/2 meters) |
Note that some components needed for the optional circuits are included in the 'Basic Components' if they the same as some components used in the basic assembly. 'Spares' means these are basic components that you might you to have a few extra in case of a failure in assembly or tuning.
In the assembly instructions are tables indicating some of the standard schemes for identifying resistors and capacitors, and well as how to find the 'positive' leads on polarized components. Note that you can also use a multimeter to measure resistors, and some can identify the orientation of diodes. Finally, you can use the bags that the components come in to identify them, the component is specifically, if sometimes a bit cryptically, labeled.
The following is a step-by-step assembly guide for the V3.0 PCB MegaSquirt partial kit. Read through all of these directions first. Be sure to check off each step as you complete it - this way you can take breaks and know where you left off. The first time assembler of average skill can count on spending 8 to 12 hours assembling and testing the MegaSquirt V3.0 main board if they follow the instructions below. To assemble your MegaSquirt, you will need:
Power Supply Construction & Testing
1. Get ready for assembling your MegaSquirt. Plan on taking 6 to 8 hours for the average person with average skills doing a first time assembly.
2. Now we will install the two 'external' connectors, the DB9 and DB37. Install and solder the male DB-37 header (P2) {A23289-ND or A32103-ND} on the PCB. The connectors require a bit of force to 'snap' them into place. Solder all of the pins to give the headers the maximum physical strength. Make sure you do not bridge adjacent pins with solder. Also make sure you do not trap any debris under the connectors - once they are soldered in place, you will never get it out. Be sure to get the correct connector on the stim and MegaSquirt. Do not mix them up. Do NOT use gender changers to 'fix' incorrectly installed connectors - it WON'T work!
Then install and solder the female DB-9 header (P1) {A23305-ND or A32119-ND}.
Note that on current production boards, there is no jumper to connect/not-connect +5V to pin #9 on the serial connector. It has 5 Volts all the time. This is normally okay, however with MegaView there is a problem. Pin #9 goes into a dead short on the MegaView board. The quickest solution is to cut pin 9 off on the connector or cut the wire for pin 9 on the cable - its not needed for anything. In future revisions we will put a jumper on the supply to pin #9 for bluetooth wireless devices. If your main board has that jumper, you do not need to do anything other than remove the jumper to use MegaView.
3. Next, install the 40-pin DIP socket {AE7240-ND or AE10018-ND} for the processor - notice that the notch installs near the bottom of the board, corresponding to the PCB silk screen. The socket must be installed from the top of the board, and soldered from the bottom side. To prevent the socket from falling out while you turn the board upside down and solder, you can use a bit of scotch tape across the socket to hold it in place (this works for many of the ICs and some other components). Carefully solder the socket, and inspect each solder joint for shorts (to adjacent pins) or cold joints (solder applied to a joint the isn't hot enough to flow properly, typically they won't have a nice 'cone' to the solder).
Next, you are going to install the components that make up the MegaSquirt V3.0, and then verify operation:
4. Install and solder MOV1
5. Install and solder C1, C3, C13, C18, C19, C23, C26, C27, C28, C29
6. Install and solder C21
7. Install and solder C16, C17 - make sure polarity is observed
8. Install and solder C2, C9, C10
9. Install and solder C20
10. Install and solder C14, C22 - make sure polarity is observed
11. Install and solder C24
12. Install and solder C25
13. Install and solder C4, C6, C8, C15
14. Install and solder C5, C7
15. Install and solder L1, L2 - Space the inductor about 3mm off the PCB
16. Install and solder H1
17. Install and solder F1, F2
18. Install and solder U4
19. Install and solder U5
20. Install and solder U6
21. Install and solder U2
22. Install and solder R16, R19
23. Install and solder R2, R9, R10, R32, R36
24. Install and solder R1, R6, R14, R17, R21
25. Install and solder R22
26. Install and solder R11
27. Install and solder R23
38. Install and solder R15, R20
29. Install and solder R4, R7
30. Install and solder R18, R30, R31, R33, R34, R35
31. Install and solder R3
32. Install and solder R37, R38
33. Install and solder R40
34. Install and solder R5, R8
35. Install and solder Q1, Q5
36. Install and solder Q2
37. Install and solder Q3, Q11
38. Install and solder Q10, Q13, Q14, Q15, Q19
39. Install and solder Q9, Q12 - MUST have an insulator
40. Install and solder D3, D9, D10, D11
41. Install and solder D12
42. Install and solder D13
43. Install and solder D17, D18
44. Install and solder D19
45. Install and solder D4
46. Install and solder D5, D7 - 3mm off the board
47. Install and solder D6, D20, D21
48. Install and solder Y1 - CLUE IT
49. Install U1
Read the MS EXTRA SPARK OUTPUT MANUAL --> http://www.msextra.com/manuals/MS_Extra_Ignition_Hardware_Manual.htm#msdout
Read the MS EXTRA TRIGGER INPUT MANUAL --> http://www.msextra.com/manuals/MS_Extra_Ignition_Hardware_Manual.htm#hall
For VR sensor input:
1. Install and solder C31
2. Install and solder C32
3. Install and solder R42, R55
4. Install and solder R44, R48, R53, R54
5. Install and solder R49, R50
6. Install and solder R51
7. Install and solder R45, R46
8. Install and solder R47
9. Install and solder R52 - 1 to square pad
10. Install and solder R56 - 1 to square pad
11. Install and solder Q22, Q23
12. Install and solder D24
13. Install and solder U7
14. FOR VR JUMPER VRIN to TACHSELECT & TSEL to VROUT
For HALL sensor input:
1. Install and solder C11
2. DON'T install and solder C12
3. DON'T install and solder C30
4. Install and solder R12 - 2mm off the PCB
5. Install and solder R13
6. DON'T install and solder D1 - JUMPER IT
7. DON'T install and solder D2 - JUMPER IT
8. Install and solder U3
9. FOR HALL JUMPER XG1 to XG2 & OPTOIN to TACHSELECT & TSEL to OPTOOUT
For COIL NEGATIVE trigger input:
1. Install and solder C11
2. Install and solder C12
3. Install and solder C30
4. Install and solder R12 - 2mm off the PCB
5. Install and solder R13
6. Install and solder D1
7. Install and solder 22V or 24V Zener diode to D2 place - in the reverse of the indicted orientation
Note that the stim will not be able to send a signal through this diode. If you have installed it, jumper it for operating on the stim.
8. Install and solder U3
9. FOR COIL NEGATIVE JUMPER XG1 to XG2 & OPTOIN to TACHSELECT & TSEL to OPTOOUT
Congratulations! Your MegaSquirt is complete! Have a look over the PCB to make sure you haven't missed any components. If everything looks complete, you are ready to test it all! Plug in the MegaSquirt processor, DB-9 cable, and stimulator (with its battery attached). On the stimulator, you should see the injector LEDs light up, tracking the RPM. (Note that if you have installed the VR input circuit, the stim is not currently designed to put out the sort of signal (AC) the VR circuit expects. However, by adjusting the pots at R52 and R56, you might be able to get a useable signal into MegaSquirt. The RPM may not be stable at each end of 1000-6500 range, but it should be workable over that range, at least. Then you'll know that the rpm input circuit is functioning at it should.) Also, the fuel pump light should be glowing, and if you are below 145 degree coolant temperature (adjust on the stimulator), the fast-idle LED should also glow.
If you don't pass the above tests, recheck all of the assembly steps in this section, verifying the correct components are installed with the correct orientation. If everything appears fine, check the troubleshooting tips.
Note: normal MAP readings in kPa for the MegaSquirt when the engine is not running (or is on the stimulator) should be somewhere around 85-103, depending on your elevation. You can check the tuning section of this manual for the details of how pressure varies with elevation. This is a good time to clean the excess flux from the board. A common problem with boards that were working and quit for no apparent reason is flux residue. Remove the processor. Wash your board with:
Compressed air can speed the drying process, but be aware that some of the commercial compressed air cans have a solvent that can saturate any remaining flux and cause problems.
If you want to seal the finished board, use a conformal coating. Wait until you have tested the board thoroughly though. If you do not think you will be doing much repair work on the board, you can not beat silicone conformal coating. It does require some digging to get it off for repair, however. Avoid the urethane coatings, as they are considered permanent and are a pain to try to work through.
This should slow down or prevent "solder bloom" and other deterioration of the PCB. Condensation is a fact of life for an outdoor component undergoing temperature changes. You can solder right through the stuff and the residue cleans well with pure grain alcohol.
Slide the completed PCB into the case. The wider lip of the case side is near the heat sink side of the board. This is to allow the top lid case to close. Put a bit of heat sink compound between the heat sink and the case to enhance the cooling of components by using the case itself as part of the heat sink.
Your next job is to mount the unit in the car, tune, and go!
You cannot install the MegaSquirt box under the hood. Engine bay temperatures are just too high. The recommended place to install the MegaSquirt box is in the passenger compartment (like under the seat, kick panel, etc), this is where many OEM boxes are located. In addition, you will need access to the RS-232 serial connector for tuning, which is hard to access under the engine hood. If you put the MegaSquirt box in the passenger compartment, you will not have heat-related problems (unless you mount it directly in the path of the air stream of the car heater).
MegaSquirt should be connected with a pass-through hole (and grommet) to the engine compartment for the wiring to the injectors, sensors, fuel pump, etc. If you have put your MegaSquirt together, but it does not work, don't panic, just follow the troubleshooting instructions.

Note that MegaSquirt is a bank fire injection system, you connect half the injectors to the driver for one bank (pins 32/33), the other half to the other driver (34/35) [4 are shown]. See: the FAQ. You can connect them in any order. For troubleshooting ease, having each bank on a separate driver might help. However, you might want to separate them into alternates in the firing order, which some people have claimed is theoretically slightly beneficial. As an example, on V8s with bank fire systems, manufacturers typically run one bank off one driver, regardless of the firing order. The advantage of doing it that way is it makes troubleshooting easier.
All MegaSquirt installations must have an input (tach) signal to determine engine speed. This signal comes in on pin #24 of the DB37. A variable reluctor (VR) input (tach) sensor is shown (above) for the input. To use a Hall sensor, optical sensor, or points trigger, you connect the signal to the same input pin (DB37 #24) as the VR sensor. You must ground the VR other lead of the sensor as well, and pin #7 is shown for this. However, pin 7 is not a 'dedicated' or specialized ground for the VR sensor, it just happens to be a ground. The VR sensor can be grounded to any pin that connects to the board's ground, and it can be connected externally (I.e., in the DB37 connector for the harness, or even in the wiring loom).
The DB37 pin #36 is an output, used to control an ignition module, or control a coil directly (if the high current ignition driver circuit is installed). It only needs to be connected if you are controlling ignition timing and dwell.
If you are using PWM Idle control, you cannot use the FIdle relay on the relay board, and have to jumper the relay socket. The jumper goes from the relay socket hole nearest the CB1 polyfuse to the relay socket hole nearest DB37 pin #4.
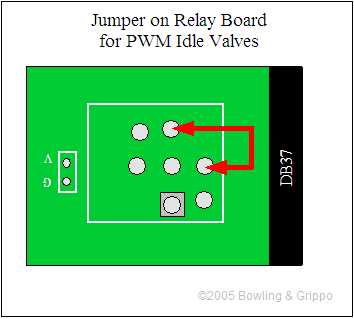
This provides a direct signal from the MegaSquirt to the PWM idle valve. Note that the transistor on the V3 main board is NOT sufficient to drive a Ford PWM Idle valve (as well as many other makes) directly. You MUST use the another transistor (such as a TIP120/121/122) that control the valve. You can use the proto area to connect this circuit, or you can build it externally.